School Uniform with Striped Tie Applique: A Practical Guide for Embroidery Workflows
Integrating detailed design elements into machine embroidery requires more than just selecting a pattern; it demands an understanding of how digital assets translate into physical textiles. The School Uniform with Striped Tie Applique represents a specific niche within this craft, blending the aesthetic of traditional boarding school attire with the technical precision required for modern embroidery machines. This design is not merely a decorative element but a structured component that fits seamlessly into broader creative workflows, whether you are producing custom merchandise, crafting personalized gifts, or developing a small business product line.
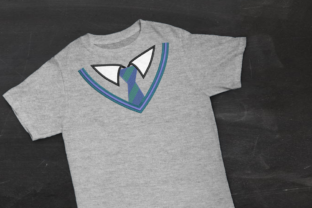
For professionals and hobbyists alike, understanding the mechanics of this specific applique design is crucial. It features a faux boarding school uniform layout, including a shirt collar, a striped embroidered tie, and a dual-colored V-neckline beneath them. The complexity lies in the layering and the precise color changes required to achieve the intended visual depth. By treating this design as a modular asset within your production pipeline, you can enhance efficiency and maintain consistent quality across various projects.
Understanding the Design Structure and Technical Requirements
Before loading the file into your machine, it is essential to analyze the structural components of the School Uniform with Striped Tie Applique. This design is engineered with distinct steps separated by color changes. This separation is intentional, allowing for the placement of fabric pieces during the applique process. Unlike simple satin stitch designs, this pattern requires active intervention from the operator at specific intervals. If you are using a multi-needle machine, it is critical to set the device to stop for color changes rather than allowing it to run continuously. Ignoring this setting can lead to misaligned layers and ruined garments.
The design includes nine formats compatible with four hoop sizes, providing flexibility for different machine models. However, the most suitable application for this specific 4x4 inch configuration is for newborn or preemie sizes, or even teddy bear clothes. This size constraint dictates the scale of your project planning. Attempting to scale this design significantly beyond its intended dimensions may result in loss of detail, particularly in the striped tie and collar areas. Therefore, integrating this asset into your workflow begins with selecting the right substrate and hoop size that matches the design’s native resolution.
Preparation and Material Selection
Successful implementation starts long before the needle hits the fabric. Preparation involves selecting materials that complement the rigid structure of a school uniform aesthetic. Since the design mimics a formal look, using high-quality cotton or poly-cotton blends for the base garment ensures durability and a crisp appearance. For the applique portions, choose fabrics that contrast well with the background but do not fray excessively, as the zigzag or satin stitch borders must secure the edges cleanly.
Organization is key during this phase. Because the design relies on multiple color changes, pre-winding bobbins and threading needles with the exact shades specified in the design notes can save significant time. The striped tie, in particular, requires precise thread colors to maintain the visual integrity of the "school colors" concept. If you are customizing the design for a specific client or brand, map out the thread chart beforehand. This prevents mid-production pauses where you might need to source a specific shade of navy or burgundy, thereby disrupting your workflow efficiency.
Integration into Creative and Business Workflows
In a professional context, the School Uniform with Striped Tie Applique can serve as a versatile asset across various stages of product development. For entrepreneurs selling personalized baby items, this design offers a unique value proposition. It transforms a standard onesie or bib into a themed keepsake, appealing to parents who appreciate novelty and craftsmanship. By positioning this item as part of a coordinated set—perhaps paired with matching hats or blankets—you can increase the average order value and create a cohesive brand identity.
For educators or community groups, this design can be adapted for fundraising events or club merchandise. The ability to use specific house colors allows for customization without altering the underlying digitization. This flexibility means you can offer multiple variations from a single digital file, reducing the need for purchasing numerous distinct designs. When integrating this into a sales platform, ensure that your product descriptions clearly state the size limitations (newborn/preemie) to manage customer expectations and reduce return rates.
Execution: Managing Color Changes and Hooping
The execution phase is where attention to detail determines the final quality. As noted, the steps are separated by color changes. This requires a disciplined approach to hooping and fabric placement. Start by stabilizing your garment appropriately; tear-away stabilizer is often sufficient for knit fabrics, while cut-away may be better for stretchy materials to prevent distortion during the stitching process.
- Initial Placement: Hoop the stabilizer and base fabric securely. Ensure the grain line is straight to prevent the uniform design from appearing skewed.
- Positioning Stitch: Run the initial placement stitch. This is a critical checkpoint. Verify that the design is centered and aligned correctly before proceeding.
- Applique Fabric Placement: When the machine stops for the first color change, place the fabric piece for the shirt collar or V-neck. Use temporary spray adhesive or pins to hold it in place, ensuring it covers the placement area completely.
- Tack Down Stitch: Resume the machine to sew the tack-down stitch. This secures the applique fabric before the final trimming.
- Trimming: Carefully trim the excess fabric close to the stitch line. Use sharp, curved scissors to avoid cutting the stitches themselves.
- Final Satin Stitch: Continue the design to complete the border and detailed elements like the striped tie.
This process must be repeated for each layered element. Rushing through the trimming or fabric placement stages can result in bulky seams or exposed raw edges, which detract from the professional finish. Consistency in this process is vital if you are producing multiple units. Developing a standardized routine for these steps ensures that each item meets the same quality control standards.
Post-Production and Quality Control
Once the embroidery is complete, the work is not finished. Proper post-production handling ensures the longevity of the design. Remove the garment from the hoop carefully to avoid stretching the stitched areas. Trim any remaining loose threads, paying special attention to the back of the embroidery where jump stitches may remain. For items intended for newborns, ensure that all stabilizer remnants are removed thoroughly to prevent skin irritation.
Quality control should involve inspecting the density of the stripes on the tie and the sharpness of the collar points. These areas are prone to puckering if the tension was not adjusted correctly or if the stabilizer was insufficient. Documenting any issues encountered during production can help refine your settings for future runs. Over time, this data becomes a valuable resource for optimizing your workflow, reducing waste, and improving turnaround times.
Long-Term Usability and Asset Management
The School Uniform with Striped Tie Applique comes in a zip file containing multiple formats. Proper digital asset management is essential for long-term usability. Store the original files in a cloud-backed folder structure organized by theme, size, and machine compatibility. This ensures that you can quickly locate the correct format when a new order comes in, regardless of which machine you are using at the time.
Furthermore, consider how this design interacts with other resources in your library. Can it be combined with monograms or additional motifs? While the design is complex, leaving negative space around it might allow for personalization. Testing these combinations on scrap fabric before offering them to clients helps mitigate risk. By viewing this design as part of a larger ecosystem of creative tools, you maximize its utility and return on investment.
In conclusion, the School Uniform with Striped Tie Applique is more than a decorative pattern; it is a test of technical skill and workflow discipline. By respecting the color change requirements, preparing materials meticulously, and integrating the design into a structured production process, creators can produce high-quality, professional results. Whether for personal enjoyment or commercial enterprise, mastering this design enhances your overall embroidery capabilities and opens new avenues for creative expression.